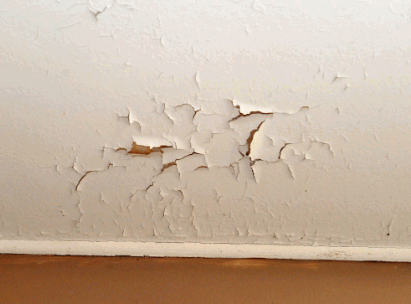
Are you noticing cracks or deterioration in your plaster walls? Understanding the causes and knowing how to repair them can help maintain the integrity of your walls.
From age and moisture damage to poor installation, there are various factors that can lead to plaster wall issues.
This article will discuss the common causes of plaster wall damage, how to prepare for repair, different methods for repairing plaster walls, and tips for finishing and painting the repaired walls.
Let's get started!
What Causes Plaster Walls To Crack Or Deteriorate?
Plaster walls can develop cracks and deteriorate due to various factors such as age, moisture or water damage, structural movement, and poor installation techniques.
Age is a significant factor in the deterioration of plaster walls. Over time, the materials used in the plaster can break down and weaken, leading to cracks and instability. These cracks may start small but can expand over time if not addressed. Additionally, moisture or water damage caused by leaks or high humidity levels can seep into the plaster, causing it to soften and crumble. This weakened state makes the wall more susceptible to cracks and decay.
- Structural movements, such as settling foundations or seismic activity, can also contribute to plaster wall issues. The shifting of the structure can put stress on the walls, leading to cracks and damage.
- Poor installation techniques, like insufficient drying time between coats or improper mixing of plaster, can result in weak bonds between layers. This weakness can manifest as cracks and deterioration over time.
Find out more: How To Strip Wallpaper Without Damaging Plaster
Age Of The Plaster
The age of plaster is a significant factor that can lead to cracks and deterioration in plaster walls, especially in buildings with plaster dating back to World War II or earlier.
Over time, the materials used in older plaster can break down, causing the walls to become less stable and more prone to damage. This can result in hairline cracks, bulging, or even chunks of plaster falling off. The aging process also makes the plaster more susceptible to moisture damage, leading to issues like efflorescence and damp patches on the surface. In some cases, the bond between the plaster and underlying structures weakens, increasing the risk of detachment from the wall.
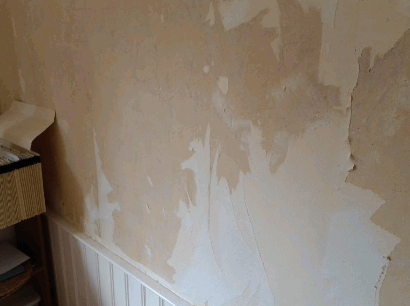
Moisture Or Water Damage
Moisture or water damage is a common cause of cracks and deterioration in plaster walls, particularly in areas prone to leaks or high humidity levels.
When moisture seeps into the plaster walls, it can lead to various issues such as peeling paint, bubbling plaster, or even mould growth, compromising the structural integrity of the wall. These signs of water-related damage should not be ignored, as they can worsen over time and result in costly repairs. To address this, it is crucial to identify and fix the source of the moisture, whether it's a leaky pipe, damaged roof, or poor ventilation. Repairing the damaged plaster and improving ventilation can help prevent future moisture-related issues.
Structural Movement
Structural movement, such as settling of the building or ground shifts, can result in cracks and damage to plaster walls, causing them to deteriorate over time.
When a building settles, the foundations can shift, causing stress on the walls. This stress often manifests in cracks that can start small but gradually worsen over time. Ground movements, like earthquakes or soil erosion, can further exacerbate these issues. The integrity of the walls is compromised, affecting not only the aesthetic appeal but also the structural stability of the building. It is crucial to address these issues promptly to prevent further deterioration and maintain the overall safety and longevity of the structure.

Poor Installation
Poor installation techniques during the initial plastering process can contribute to cracks and deterioration in plaster walls, leading to the need for repairs and renovations.
One common mistake that can significantly impact plaster wall integrity is improper mixing of the plaster material. When the ratio of plaster to water is incorrect, it can weaken the overall structure and make it more prone to cracking over time.
Insufficient drying time between plaster coats can also cause issues. If subsequent layers are applied before the previous one has fully dried, it can lead to trapped moisture and air bubbles, ultimately compromising the strength and stability of the wall.
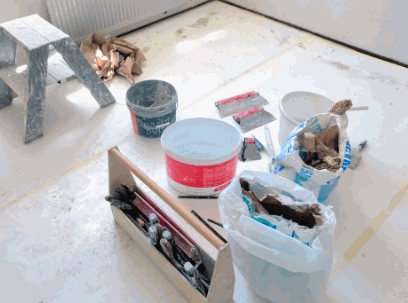
How To Prepare For Plaster Wall Repair
Before starting the plaster wall repair process, it is essential to gather the necessary tools and materials, assess the damage, and prepare the area for restoration.
- Once you have the required tools in place, you should begin by carefully examining the damaged area. Use a putty knife to gently scrape off any loose plaster, revealing the extent of the damage beneath. This step will help you determine the best approach for repair.
- After assessing the damage, the next crucial step is to ensure that the area is clean and free of dust and debris. This can be done by using a damp sponge to wipe down the walls and remove any residual plaster or dirt. By doing this, you create a smooth surface for the repair work ahead.
Gather The Necessary Tools And Materials
To prepare for plaster wall repair, gather essential tools like plastering float, hawk, and joint compound, along with materials like PVA, Loctite Power Grab, and Plaster Magic for effective repairs.
A plastering float is essential for smoothing and leveling the plaster surface. The hawk acts as a portable platform to hold the plaster mix while working, facilitating easy application. The joint compound helps fill in cracks and gaps to ensure a seamless finish.
Materials like PVA are used as a primer to improve adhesion, while Loctite Power Grab provides strong bonding to secure the plaster. Plaster Magic is a crucial component for repairing damaged plaster, allowing for a durable and long-lasting fix.
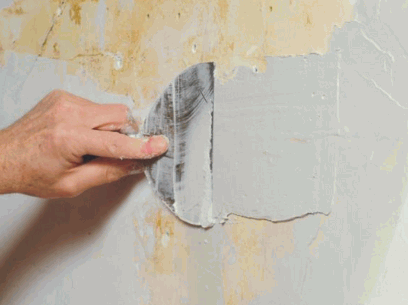
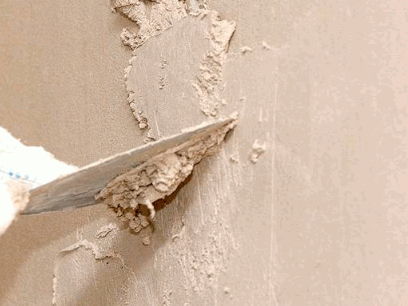
Remove Any Loose Or Damaged Plaster
Before repairing plaster walls, it is crucial to remove any loose or damaged plaster using appropriate techniques to create a solid base for the repair work.
One of the first steps in this process is to carefully inspect the walls for any signs of loose or flaking plaster. This can often be identified by tapping the walls lightly; if you hear a hollow sound, it indicates that the plaster is not properly adhered to the wall beneath.
To start the removal process, gently use a putty knife or a scraper to chip away at the loose plaster. It is important to work slowly and methodically to avoid causing further damage to the surrounding areas.
Once all the loose plaster has been removed, thoroughly clean the area to ensure a smooth and debris-free surface for the repair compound to adhere to.
Clean The Area To Be Repaired
Cleaning the area to be repaired is essential to ensure proper adhesion of the new plaster or patch, removing dust, debris, and contaminants that can affect the repair's quality.
- Start the cleaning process by clearing the area of any loose plaster or paint chips using a putty knife or scraper. This step is crucial as loose debris can compromise the adhesion of the new plaster.
- Next, use a damp cloth or sponge to wipe down the surface, removing any remaining dust or dirt. A clean surface is key to a successful plaster repair.
- For stubborn stains or grease marks, a mild detergent solution can be used to ensure thorough cleaning. Allow the area to dry completely before proceeding with patching or plastering.
Methods For Repairing Plaster Walls
There are several methods for repairing plaster walls, including patching with plaster, using plasterboard compound, applying the jointing compound, and utilising Plaster of Paris for different repair needs.
When patching plaster walls, it is essential to prepare the surface by removing any loose debris and creating a smooth base for the patch material. Plasterboard compound is a popular choice due to its ease of use and ability to adhere well to the existing plaster. On the other hand, the jointing compound is commonly used for repairing minor cracks and imperfections, providing a smooth finish once sanded down. For more significant repairs, Plaster of Paris can be mixed with water to create a durable and long-lasting repair solution.
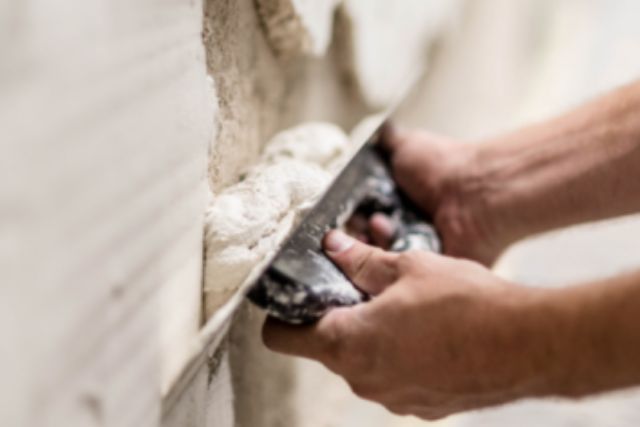
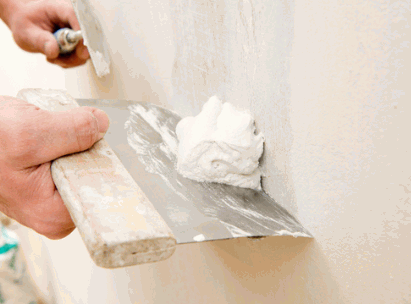
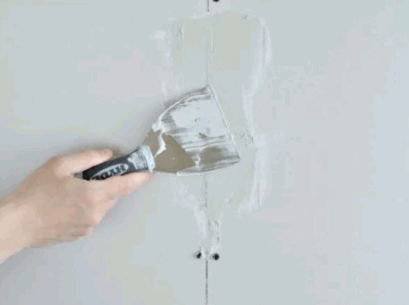
Patching With Plaster
Patching with plaster is a traditional method for repairing small holes and cracks in plaster walls, requiring the mixing of plaster to create a base coat for filling and smoothing.
This process begins by preparing the surface of the damaged area and clearing away any loose debris or old plaster. The next step involves mixing plaster according to the manufacturer's instructions, ensuring a smooth consistency without lumps. Once the plaster is mixed, it is applied to the damaged area using a trowel, starting from the centre and working outwards to create a seamless finish. After the base coat is applied, it is left to dry completely before sanding and applying additional coats for a flawless repair.
Using Drywall Compound
Repairing plaster walls with drywall compound offers a convenient alternative for filling and smoothing surface imperfections, providing a quick and effective solution for minor damages.
When using drywall compounds for plaster wall repairs, it is essential to prepare the damaged area properly before application. Start by removing any loose debris and cleaning the surface thoroughly. Apply a coat of undercoat to improve adhesion and prevent future peeling. Next, mix the drywall compound to a smooth consistency.
Using a putty knife, carefully apply the compound to the damaged area, starting from the center and working outwards to feather the edges. Multiple thin layers may be needed for larger repairs, allowing each layer to dry completely before sanding. Sand the dried compound gently to achieve a seamless finish, ensuring the repaired area blends seamlessly with the rest of the wall.
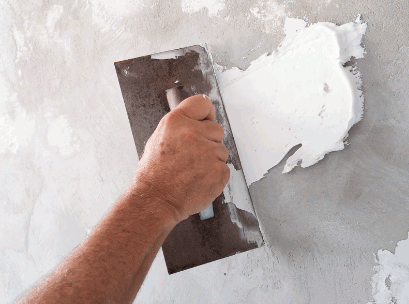
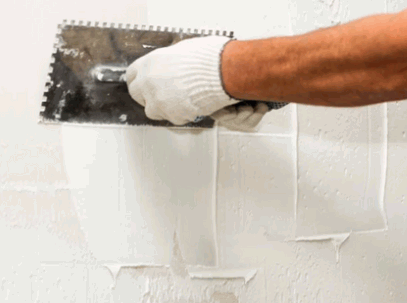
Applying Joint Compound
Applying joint compound is a common method for repairing plaster walls, offering flexibility and ease of application to fill gaps, tape joints, and create a seamless finish.
When working on repairs, it is essential to use fibreglass mesh tape to reinforce the joint compound, ensuring durability and preventing cracks over time. After applying the tape, skilled technicians use various smoothing techniques such as feathering and blending to achieve a professional-looking surface. Once the compound is dry, sanding is required to achieve a smooth texture, using fine-grit sandpaper to avoid damaging the newly repaired area. This meticulous process guarantees a flawless result that seamlessly integrates with the rest of the wall.
Using Plaster Of Paris
Using Plaster of Paris for repairing plaster walls is ideal for creating intricate moulds, decorative elements, or precise repairs that require a durable and quick-setting material.
One of the main benefits of using Plaster of Paris in plaster wall repairs is its versatility. This material can be easily mixed to create a smooth paste that can be moulded into various shapes to fit the specific requirements of the repair. Whether you need to recreate ornate designs, fill in cracks, or sculpt custom features, Plaster of Paris offers a reliable solution.
The quick-setting nature of Plaster of Paris allows for efficient work, reducing the overall downtime during repairs. This is especially advantageous when dealing with minor damages that need immediate attention. By quickly mixing the plaster, applying it to the damaged area, and smoothing it out, you can achieve seamless results in a relatively short amount of time.
How To Finish And Paint Repaired Plaster Walls
Choosing the right paint colour can completely transform the look and feel of the space, so take your time to select a shade that complements the overall decor.
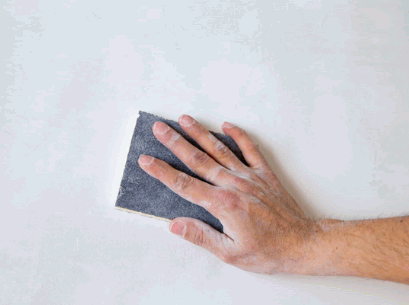
Sanding And Smoothing The Surface
Sanding and smoothing the repaired plaster surface is essential to create a uniform and level finish, removing imperfections, and preparing the wall for painting.
Surface preparation is key before you begin sanding. Make sure to clean the area thoroughly and fill any cracks or holes with appropriate filler. Once the surface is dry, you can start sanding with the right grade of sandpaper. Begin with a coarse grade, around 80-120, to level out major imperfections, and then move on to finer grades like 180-220 for a smoother finish.
Remember that proper technique is crucial when sanding plaster. Use a light touch and circular motions to avoid creating uneven patches. After sanding, wipe down the surface with a damp cloth to remove dust and debris before painting.
Priming The Wall
Priming the repaired plaster wall is crucial to ensure proper adhesion of the paint, seal the surface, and enhance the paint's durability and finish for a professional look.
Before priming the repaired plaster wall, it is important to choose the right type of primer based on the surface condition. Common types of primers include:
- oil-based primers for better adhesion on porous surfaces
- acrylic primers for quick drying and easy clean-up
- stain-blocking primers to prevent bleed-through from water stains or ink marks
Once the primer type is selected, apply it using a brush, roller, or sprayer in even strokes to ensure uniform coverage.
Allow the primer to dry completely as per the manufacturer's instructions before applying the final coat of paint for a flawless and long-lasting finish.
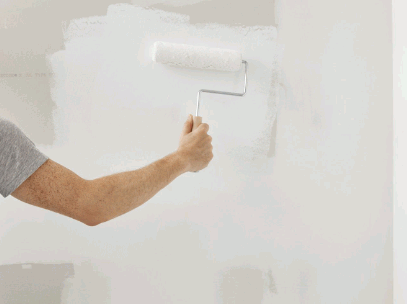
Painting The Wall
Painting the repaired plaster wall is the final step in the repair process, allowing you to choose colours, finishes, and styles that enhance the aesthetic appeal of the room and provide long-lasting protection.
When selecting paint for your repaired plaster walls, opt for a high-quality acrylic latex paint that offers good coverage and durability. Before application, ensure the wall is clean and dry, and prime it with a suitable primer to improve adhesion and achieve a smooth finish. To apply the paint, use a roller for large areas and a brush for edges and corners, ensuring even coverage. Once the paint is dry, consider adding decorative elements like stencilling or faux finishes to personalise the space and create a unique look.