Looking to upgrade your driveway with a durable and low-maintenance option that enhances the aesthetics of your property?
A resin-bonded driveway might be the perfect solution for you.
In this article, we will discuss the benefits of choosing a resin-bonded driveway, the step-by-step process of laying one, the necessary tools and materials, and how to effectively maintain it for long-lasting results.
Keep reading to learn all you need to know about resin bonded driveways.
What Is A Resin Bonded Driveway?
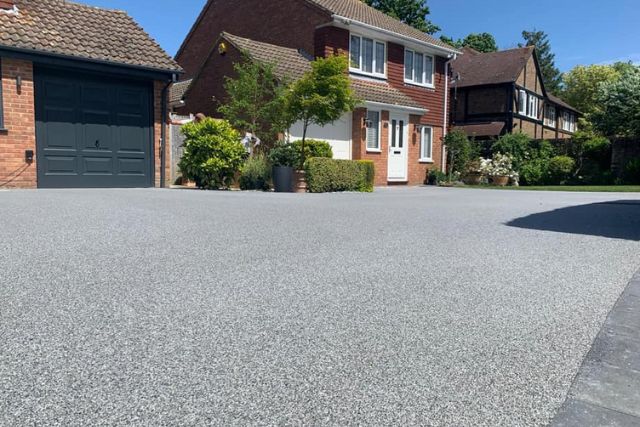
A resin bonded drive involves a surface where resin is applied over a suitable base and then the aggregate is scattered across it, providing a visually appealing and durable finish.
The process of creating a resin bonded drive starts with the application of a special resin mixture that acts as an adhesive. Once the resin is evenly spread over the surface, the chosen aggregate material is then carefully broadcasted to form a seamless and textured look. This marrying of resin and aggregates not only enhances the appearance of the drive but also significantly boosts its strength and longevity. The end result is a smooth, slip-resistant finish that can withstand heavy traffic and varying weather conditions, making it a popular choice for both residential and commercial properties.
Why Choose A Resin Bonded Driveway?
Selecting a resin bonded drive offers advantages in terms of durability, low maintenance needs, and aesthetic appeal, making it a popular choice for homeowners seeking a long-lasting and visually pleasing drive solution.
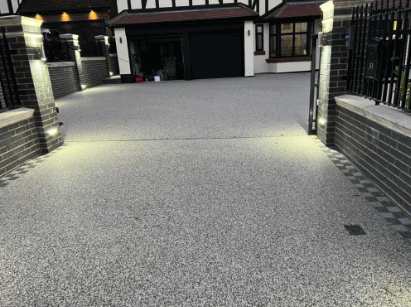
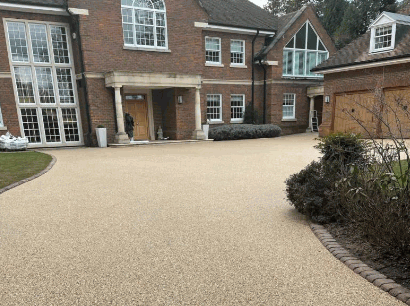
A resin bonded drive stands out by providing a durable surface that can withstand heavy loads and harsh weather conditions, ensuring longevity without frequent repairs. This type of drive requires minimal upkeep, saving both time and money for homeowners. The smooth finish and range of colour options enhance the overall look of the property, creating a modern and sleek appearance that adds kerb appeal.
Durability
Durability is a key feature of resin bonded driveways, ensuring long-lasting performance against weathering, heavy traffic, and other external factors, making it a sustainable driveway solution.
Resin bonded driveways are designed to withstand the harsh elements of nature, including rain, snow, UV rays, and temperature fluctuations, without compromising their integrity. This attribute allows them to maintain their aesthetic appeal and structural integrity over time, reducing the need for frequent repairs or replacements.
The durable nature of resin bonded driveways enables them to accommodate heavy vehicles and regular traffic loads without showing signs of wear and tear. This makes them an ideal choice for residential and commercial properties alike, offering a reliable and long-term surfacing solution.
Low Maintenance
Low maintenance requirements make resin bonded driveways a convenient choice, eliminating the need for frequent upkeep and ensuring a hassle-free experience for homeowners.
One of the key advantages of resin bonded driveways is their ability to resist weed growth, reducing the need for constant weeding and maintenance. Resin bonded surfaces are also highly durable, withstanding heavy foot traffic and vehicle weight without deteriorating quickly. In addition, these driveways are easy to clean, requiring only occasional sweeping or power washing to maintain their attractive appearance.
Aesthetics
Aesthetically pleasing finishes are a hallmark of resin bonded driveways, offering a wide range of design options, colours, and textures to enhance the kerb appeal of residential properties.
These driveways not only provide a durable and low-maintenance surface but also elevate the overall look of the property. The versatility in design allows for intricate patterns, bold colour choices, and unique textures that can complement any architectural style. The customisation options in resin bonded driveways enable homeowners to create a personalised and distinctive entrance to their homes, making a lasting impression on visitors.
What Are The Steps To Lay A Resin Bonded Driveway?
Laying a resin bonded driveway involves several key steps, including preparation, base laying, resin and aggregate mixing, application of the mixture, and surface sealing, ensuring a proper and durable installation.
The area where the driveway will be installed needs thorough excavation to create a stable foundation. This is followed by the laying of a compacted sub-base to support the weight and traffic load.
Next, a resin binder is prepared by mixing the resin and chosen aggregate in precise proportions, ensuring a consistent blend. The mixture is then applied evenly onto the prepared surface, creating a uniform and smooth finish. A protective sealant is applied to enhance durability and resistance to weather elements, completing the meticulous process.
Preparation
Thorough preparation is essential for a successful resin bonded driveway installation, involving site clearance, base compaction, and ensuring a suitable foundation for the resin and aggregate mixture.
Site clearance sets the stage by removing any existing debris, ensuring a clean canvas for the new driveway. Subsequently, proper base compaction is pivotal, as a stable foundation prevents future issues such as sinking or uneven surfaces, maintaining the driveway's integrity over time. Proper foundation requirements dictate the depth and materials needed to support the resin and aggregate mixture, promoting durability and longevity.
Laying The Base
The base laying process in a resin bonded driveway installation involves creating a stable foundation using materials like MOT type 1 and ensuring proper compaction for long-term structural integrity.
After the initial excavation and clearing of the area, the next step is to ensure that the sub-base is firm and well-compacted to prevent any movement or sinking in the future. This involves spreading a layer of MOT type 1 evenly across the prepared area and using a mechanical compactor to achieve the desired density.
- Once the MOT type 1 is in place, it is crucial to carefully check the levels and ensure that there are no soft spots that could compromise the stability of the base.
- Proper drainage considerations should also be taken into account at this stage to prevent water accumulation that could weaken the base over time.
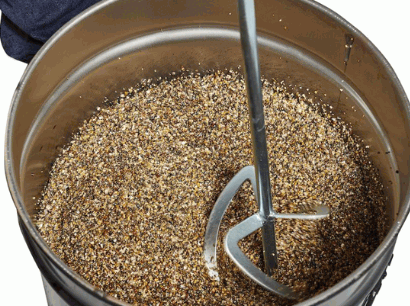
Mixing The Resin And Aggregate
Properly mixing the resin and aggregate is crucial for achieving a uniform and durable surface in a resin bonded driveway, ensuring a consistent blend that enhances the driveway's strength and appearance.
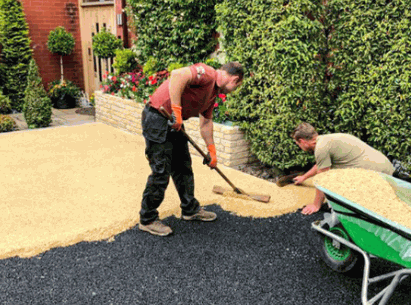
When blending resin and aggregates, it is essential to follow the recommended ratios and techniques to guarantee optimal results. **The ratio** of resin to aggregate is typically around 1:4, but this can vary depending on the specific product and application requirements. It is advisable to use specialised equipment like a paddle mixer to ensure thorough blending. Once the mixture is homogeneous, it should be immediately applied to the prepared surface to avoid premature curing. Smooth application techniques, such as trowelling or screeding, help in achieving an even finish and proper adhesion.
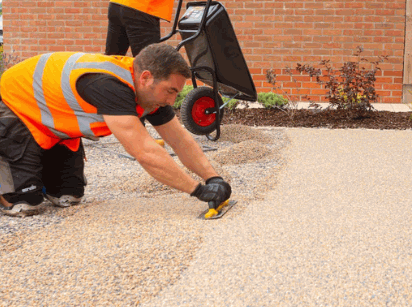
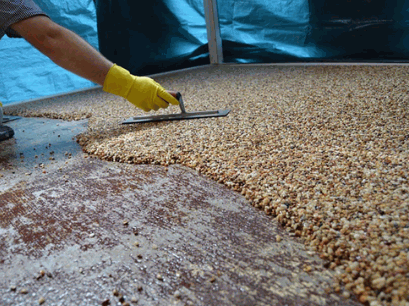
Applying The Resin Bonded Mixture
Applying the resin bonded mixture requires precision and skill to achieve an even spread of the resin over the base, followed by scattering the aggregate to create a textured surface that bonds effectively with the resin.
Once the resin is prepared, it is crucial to apply it evenly across the surface using a specialist trowel or squeegee, ensuring no areas are missed.
After the resin is spread, the next step involves carefully scattering the chosen aggregate over the resin while it is still wet, allowing it to sink in and bond securely.
Proper mixing of the resin and aggregate is essential to ensure a strong and durable finish that can withstand varying weather conditions and heavy foot traffic.
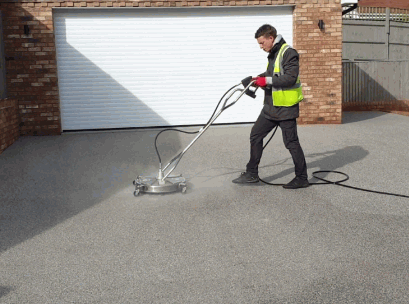
Sealing The Surface
Sealing the surface of a resin bonded driveway is essential to protect the finish from UV rays, water damage, and wear, ensuring the longevity and appearance of the driveway over time.
UV rays can lead to discolouration and fading of the resin, impacting the overall aesthetic appeal. By sealing the surface, homeowners can safeguard their investment and maintain a vibrant look for years to come. Water resistance provided by the sealant prevents moisture penetration, reducing the risk of cracks and mould growth.
The maintenance ease offered by sealed surfaces minimises the need for frequent repairs, saving both time and money. Choosing the right sealing technique and materials tailored to the specific driveway type is crucial for optimal protection and durability.
What Are The Tools And Materials Needed?
To lay a resin bonded driveway, essential tools and materials include a spade, wheelbarrow, trowel, roller, resin and aggregates, and protective gear, ensuring a smooth and efficient installation process.
When embarking on the installation of a resin bonded driveway, it's crucial to have a high-quality spade for excavating the area and moving materials efficiently. A sturdy wheelbarrow comes in handy for transporting heavy loads of aggregates and resin mixtures across the project site. The trowel is essential for spreading the resin evenly and achieving a uniform surface finish. A trusty roller ensures proper compaction of the aggregates and resin, creating a durable and long-lasting driveway.
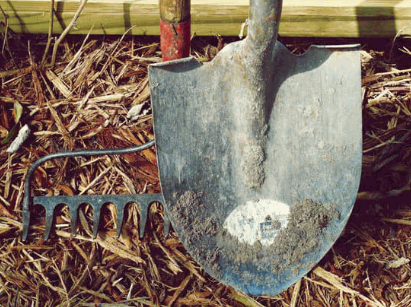
Shovel
A spade is a fundamental tool for moving and spreading materials during the installation of a resin bonded driveway, facilitating the distribution of base layers and aggregates with efficiency.
Regarding installing a resin bonded driveway, the spade plays a vital role in not only transferring the materials but also in distributing and leveling them accurately. With its robust design and ergonomic handle, a spade makes it easier for the installer to handle heavy loads of gravel, sand, or resin. Whether it's creating a smooth base layer or ensuring an even distribution of aggregates, the spade is highly versatile and critical in achieving a professional finish.
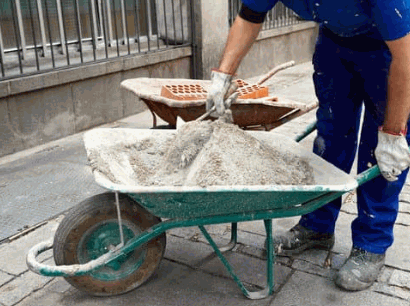
Wheelbarrow
A wheelbarrow is essential for transporting heavy materials like aggregates and base mix during the construction of resin bonded driveway, enabling efficient movement and distribution of key components.
Not only does a wheelbarrow facilitate the swift transfer of heavy loads across the construction site, but it also ensures that materials reach the designated areas with ease. With its sturdy construction and ergonomic design, a wheelbarrow greatly contributes to maintaining a smooth workflow in resin driveway installations.
The versatility of a wheelbarrow allows contractors to navigate through tight spaces and narrow pathways, ensuring that every corner of the project site is accessible. This accessibility plays a crucial role in enhancing the overall efficiency and progress of the construction process, ultimately leading to a successful resin driveway installation.
Trowel
A trowel is a precision tool used for applying and smoothing the resin bonded mixture onto the driveway surface, ensuring even distribution and a uniform finish that enhances the overall appearance.
Trowels play a crucial role in levelling the aggregates within the resin, creating a flat and consistent surface once the installation is complete. This smoothing process helps to eliminate any potential bumps or uneven spots, resulting in a visually appealing and durable driveway. Trowels are handy for finishing touches, such as creating smooth edges and corners for a polished look. The versatile nature of trowels makes them critical in achieving a professional and high-quality resin driveway installation.

Roller
A roller is a crucial tool for compacting and smoothing the resin and aggregate mixture on a drive, ensuring proper bonding, surface evenness, and long-term durability of the installation.
It plays a vital role in evenly distributing the resin across the surface, eliminating air voids, and creating a solid foundation.
The use of a roller helps enhance the aesthetic appeal of the drive by achieving a smooth, seamless finish that adds to the overall kerb appeal of the property.
By compacting the material effectively, the roller aids in preventing future issues such as sinking, cracking, and uneven settling, ensuring the structural integrity of the drive over time.
Resin And Aggregate
Resin and aggregate are the primary materials used in resin bonded driveways, offering durability, customisation options, and a visually appealing finish, ensuring a strong and attractive driveway surface.
The role of resin in driveway installations lies in its ability to create a durable and weather-resistant surface that can withstand constant traffic and various weather conditions.
On the other hand, aggregates play a crucial role in enhancing the aesthetics of the driveway by providing a range of colours, sizes, and textures.
When combined, resin and aggregates form a long-lasting and low-maintenance surface that can transform the overall look of a property.
Protective Gear
Wearing protective gear such as gloves, goggles, and suitable clothing is crucial during the installation of a resin bonded driveway to ensure personal safety and minimise exposure to chemicals and materials.
Protective equipment serves as a vital shield against potential hazards, with gloves safeguarding hands from chemical irritants and cuts, while goggles protect the eyes from splashes and fumes. Wearing appropriate attire like long sleeves and trousers shields the skin from accidental spills and abrasions.

How To Maintain A Resin Bonded Driveway?
Maintaining a resin bonded driveway involves regular cleaning, periodic resealing every few years, and prompt repair of any cracks or damages, ensuring the driveway retains its functionality and aesthetic appeal over time.
To keep your resin bonded driveway in top condition, it's essential to clean it regularly by using a mild detergent and a firm brush to remove dirt, moss, and debris. Jet washing can also be effective, but be careful not to use too high pressure as it can damage the surface. Consider resealing your driveway every 2-5 years to protect it from UV rays, oil stains, and weathering. When repairing cracks or damages, use a high-quality resin kit and follow the manufacturer's instructions for the best results.
Explore further: How To Clean Moss From Resin Driveway
Regular Cleaning
Regular cleaning is essential for preserving the appearance and longevity of a resin bonded driveway, involving simple practices like sweeping, washing, and removing debris to maintain a clean and tidy surface.
Regular cleaning not only enhances the aesthetic appeal of your driveway but also prevents the accumulation of dirt, grime, and organic matter, which can lead to discolouration and deterioration over time. To effectively clean a resin driveway, start by regularly sweeping the surface to remove loose debris, followed by a thorough wash using a gentle detergent and water. Utilising a pressure washer on a low setting can help tackle tougher stains and dirt buildup, ensuring a pristine finish.
Resealing Every Few Years
Resealing the surface of a resin bonded drive every few years is crucial to protect the finish from wear, UV damage, and water infiltration, ensuring the drive maintains its strength and appearance.
Regular resealing acts as a shield, forming a protective barrier that prevents stains, cracks, and fading caused by daily use and exposure to the elements. It not only enhances the aesthetics of the drive but also prolongs its lifespan by minimising the risk of structural damage.
Resealing also offers an opportunity to address any minor repairs, such as filling in small cracks or fixing chips, ensuring that the surface remains smooth and safe for vehicles and pedestrians.
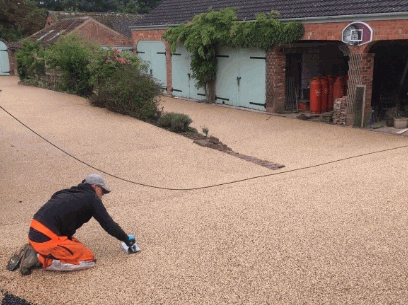
Repairing Any Cracks Or Damage
Promptly repairing any cracks or damages in a resin bonded driveway is essential to prevent further deterioration, requiring filling, patching, or resurfacing to maintain the driveway's structural integrity and visual appeal.
One important aspect of resin driveway maintenance is to address these damages promptly to avoid more extensive repairs down the line. Ignoring cracks can lead to water seepage, erosion, and overall weakening of the driveway's structure.
- Common repair techniques involve using specialised crack fillers or resin-based patching materials to seamlessly blend with the existing surface.
- Proper preparation, including cleaning and priming the damaged area, is crucial for the repair materials to adhere effectively.
- For larger damages, resurfacing the affected section may be necessary to ensure a smooth and uniform finish.
Conclusion
A resin bonded drive offers a combination of durability, low maintenance, and aesthetic appeal, making it an ideal choice for homeowners looking for a long-lasting and visually pleasing drive solution.
One of the key advantages of opting for a resin bonded drive is its durability. The resin material used in these drives is incredibly tough and can withstand heavy use without showing signs of wear and tear. These drives require minimal maintenance, as they are resistant to weeds and do not require frequent resealing like some other drive options.
Another advantage of resin bonded drives is their aesthetic appeal. They come in a variety of colours and finishes, allowing homeowners to customise the look of their drive to complement the overall design of their property. The installation process of resin bonded drives is relatively straightforward and can be completed efficiently by professionals, ensuring a smooth and seamless finish.